I’m of the opinion that if you have an internet connection, than you should be gating APRS. What is an iGate? An iGate, or Internet Gateway, shares APRS packets to the internet based APRS Internet System (APRS-IS) network. Connecting to the APRS-IS expands your local local, tactical real-time two-way communications system, and makes it world-wide. You can visualize this by visiting APRS.fi. Likewise, you can also transmit information from the APRS-IS system over the air as a two-way iGate as well. It is this setup that allows someone on VHF to message a station on HF APRS, and visa versa. It also allows you to send messages to stations that you would otherwise not be able to reach otherwise over RF. If you want to send a text message without cellular service, you need someone with an iGate, and APRS-IS assistance to make that happen.
The first thing you need, provided you have APRS running, is a password that will allow you to connect to the APRS-IS network to share information. This is easily attained in a variety of ways, but by far the fastest way is to use the APRS Passcode Generator by Peter Goodhall, 2M0SQL. Write this down and store it.
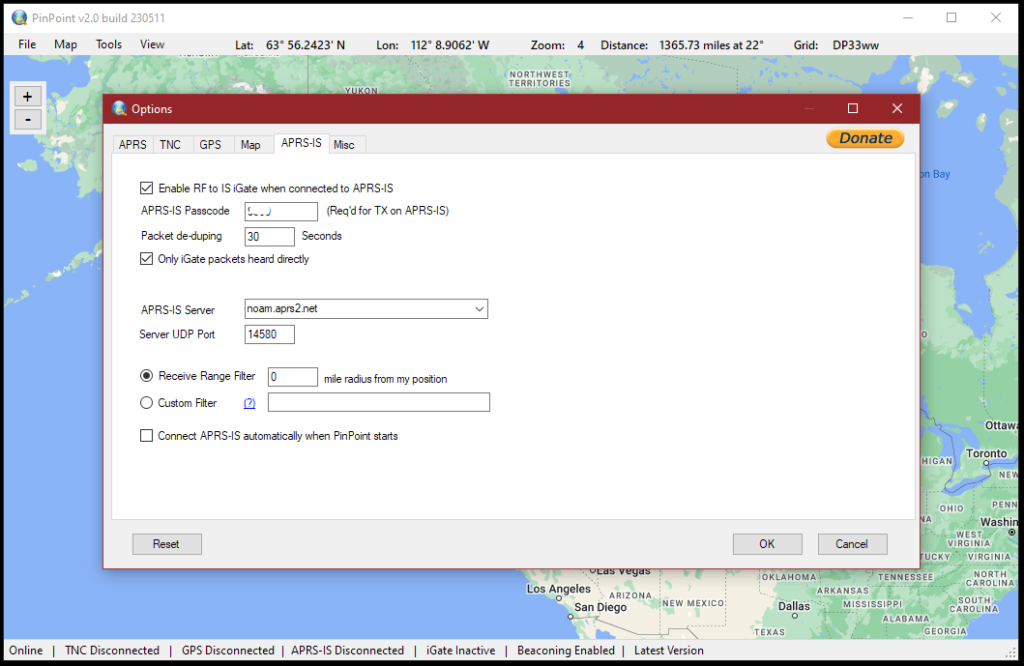
To setup PinPoint as an iGate, click on “Tools” and then select “Options.” In the Options window, go to the APRS-IS tab. Here begin by checking “Enable RF to IS Gate when connected to APRS-IS.” Under that, insert your passcode as given by the passcode generator above. Leave “Packet de-duping” as is at 30 seconds, and make sure “Only iGate packets heard directly” is checked. For “APRS-IS Server,” select your local server. They are: NOAM (North America), SOAM (South America) Euro (Europe), ASIA, and AUNZ (Australia/New Zealand.) You can choose rotate to be automatically assigned to any of them. Set the “Receive Range Filter” to “0” mile radius to see only what you hear over the air on the map. Any number greater than 0 will show stations via the APRS-IS system, and this can get quite crowded in metro areas. The final check box is up to you. When done, it should look something like the image below.
Click on OK. If you checked “Connect APRS-IS automatically” then you should see “APRS-IS Connected” at the bottom of the screen, along with the Tier 2 server to which you are connected. If you don’t see this, then click on “Tools” at the top of the window and select “Connect APRS-IS.” If you are still not connected, be sure you entered your passcode correctly in the APRS-IS options window.
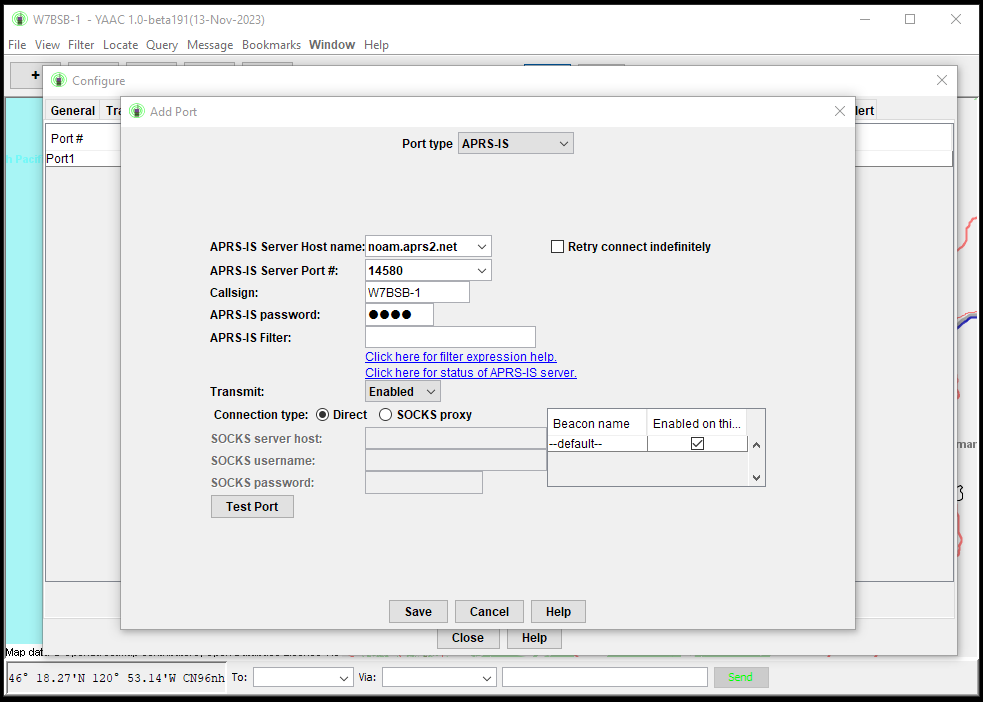
To configure an iGate in YAAC, click on “File,” go down to “Configure” and select “Expert mode.” In the configure window, go to the “Ports” tab and click on the “Add” button to bring up the “Add Port” window. At the top drop down menu, “Port type,” scroll through and select “APRS-IS.” Select your appropriate “APRS-IS Server Host name,” the options are similar to PinPoint. Leave the port # as is but make sure you callsign + -SSID are entered in the field labeled “Callsign” and the passcode you were given should be entered below that. The final thing to change is the “Transmit” dropdown should have “Enabled” selected. Things should look similar to the image below.
You can choose to test the port by clicking on the “Test Port” button. If you click on the button it will bring up another window that shows whether or not you are able to connect to the server. Otherwise you can just click on the “Save” button, and close the Configure window. One the main YAAC window, you will have a green “GO” button and a similar red “STOP” button for connecting and processing through APRS-IS servers.
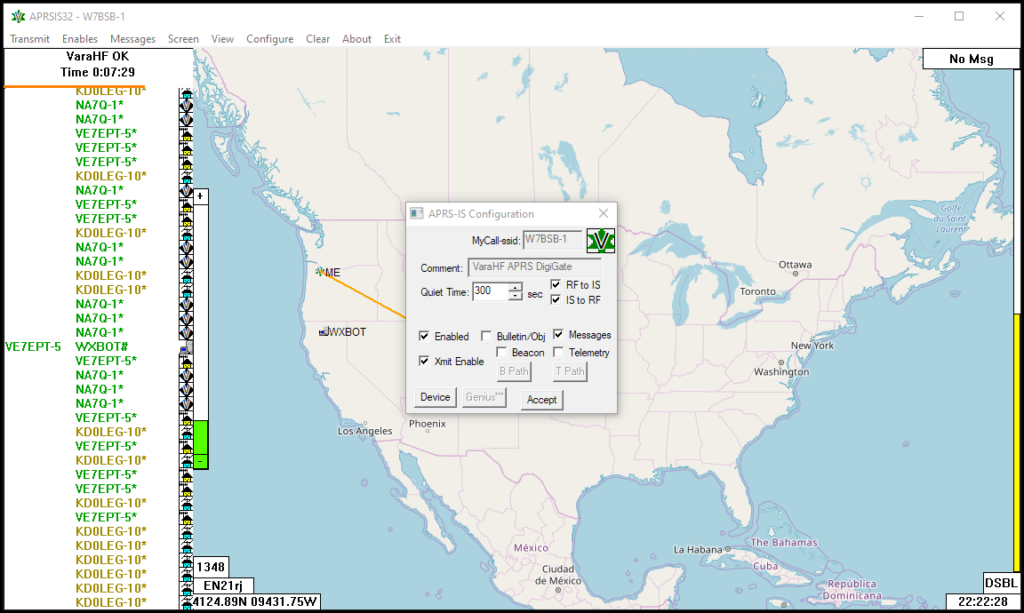
The process to setup APRSIS32 has a couple small steps involved. First, go to “Configure” and click on “General…” This window will show your callsign as you set it when you first installed APRSIS32. Under that is a “Passcode” field. This is where you enter the code assigned to you from the passcode generator above. You may have entered something else here, unknowing, when you setup APRSIS32. With your passcode entered, click on “Accept.”
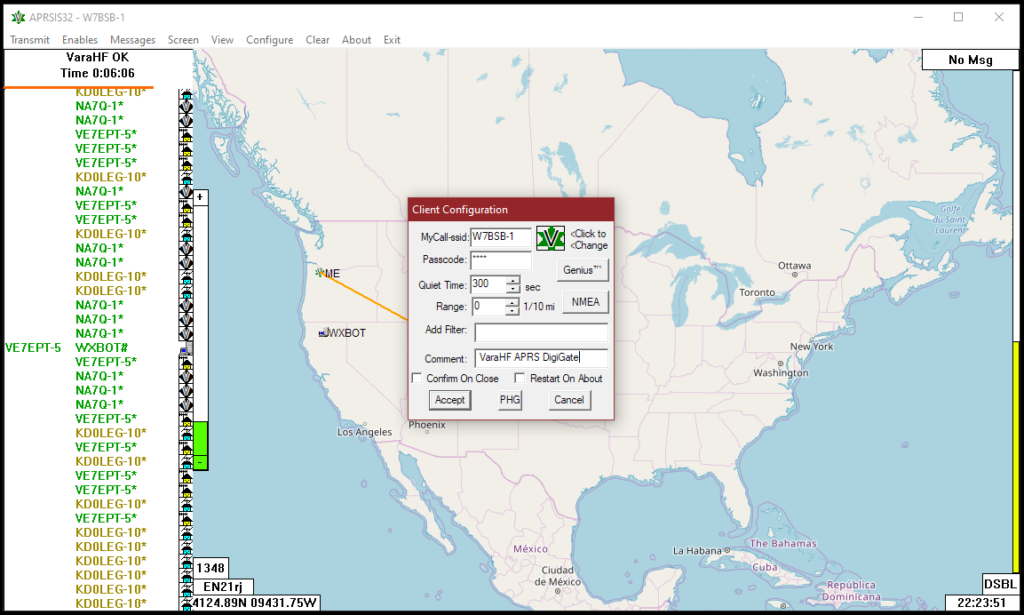
Now click on the “Enables” menu at the top, and make sure “APRS-IS Enabled” is checked. If not, you can select it now. As soon as APRSIS32 is able to connect to the APRS-IS servers, you will see “APRS-IS OK” above the scroller. Now, go back to “Configure,” go down to “Ports…” and click on “APRS-IS.” If you want to operate as a two-way iGate, sending and receiving from APRS-IS, select both “RF to IS” and “IS to RF.” “Enabled” should already be check for you if you enabled it earlier, and checking “Xmit Enable” will send messages and packets from -IS, over the air, to other users that are within your range, making you a full-fledged iGate. The other four options how APRSIS32 sends your own packets to APRS-IS. If they are unchecked, then you will rely upon another iGate to relay your packets to the internet. Anything you have checked will be both sent over the air and sent directly to the internet at the same time. Below is an example of how I run my station.
That’s the gist of how to setup your station to operate as an HF APRS iGate. iGates are an essential component of APRS global communications. While it’s not necessary for local communications, it certainly doesn’t hurt. I think anyone with internet access should be operating as an iGate.
Leave a Reply